
 Facebook encourages its users to share far more personal information than almost anywhere else on the web. While this allows the site to offer a premier online social experience, it also gives Facebook access to a lot of information about its users.
Think about all of the ways we use Facebook and all of the personal information that users share with the social media giant. Facebook enables us to interact with one another publicly and privately; we can create pages and groups and events; we share our age, hometown, the schools we've attended, where we work, pictures of ourselves and our friends, our relationship status, our current location, our likes -- you name it.
With all that information, there are likely some things that are shared or posted on Facebook, either by you or by other Facebook users, that you simply do not want to reach a public audience. How can you can control the content and information that other Facebook users and third party applications can access? This blog post offers a detailed guide designed to teach you how to do just that, so you can maintain your privacy and guarantee that no one can access any content or information that you do not want them to see.
Secure Your Account
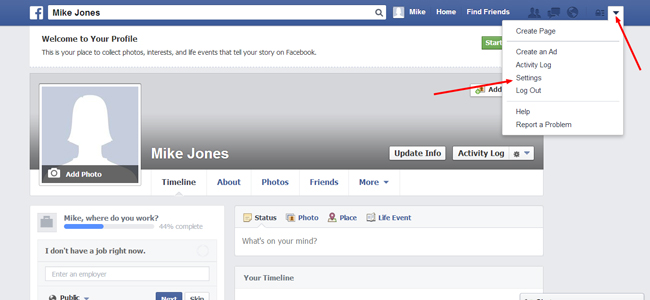
The first step toward improving your privacy on Facebook is securing your Facebook account itself. Start by locating the upside arrow in the top-left corner of your Facebook page and select "Settings" from the drop-down menu.
.jpg?t=1397835035000)
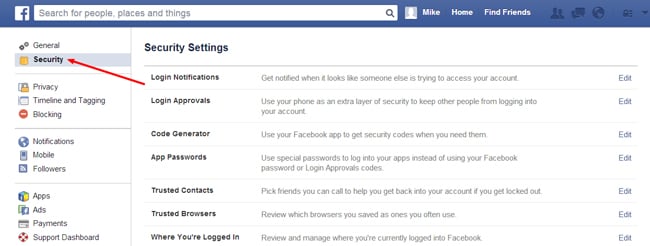
You should notice a sidebar on the left hand side of the page where you can select Security (second from the top) in order to access the Security Settings page. (This sidebar will be referred to throughout this post as we navigate through the various pages you can use to customize your Facebook privacy settings.) The Security page is where you can customize a variety of security settings in order to protect your account and your passwords from hackers and unauthorized users.
.jpg?t=1397835981000)
Login Notifications
Use this setting to opt in to receive text or email messages when your account is accessed from a device that has not previously been used to access your account. Turning this setting on will require you to authorize all of the devices you use which may seem like a hassle, but it will ensure that you are immediately identified in the event that a hacker is attempting to compromise your account.
Login Approvals
This setting will require an additional step when you or someone else attempts to access your account from an unauthorized browser. If this setting is turned on, a security code will be required anytime an attempt is made to access your account from a device that has not previously been used to access your account.
Code Generator
Use this setting in tandem with the login approvals setting to create the access code that will be required to access your Facebook from a browser that has not previously been used to access your account.
App Passwords
App Passwords are single use passwords that you can use to log into third party applications on Facebook to keep your Facebook password safe. To generate an app password, simply select “Generate App Password” next to the App Passwords security setting and designate the third party application you wish to use in conjunction with the password.
Since these are single use passwords, when you log out of the application, your password will not be saved. This means you will have to generate a new app password each time you wish to use an application.
Trusted Contacts
You can select contacts from your list of Facebook friends that can help you access your own Facebook account in the event that you are unable to do so.
The Basics: Privacy Settings and Tools
Now that we've identified the ways in which you can secure your Facebook account, let’s review the basic privacy settings you can use to ensure your profile page and the content you share on Facebook can only be viewed by your desired audience.
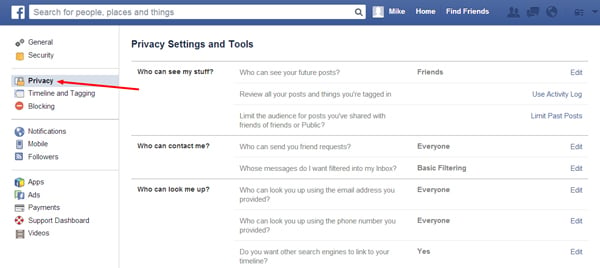
You can access your basic privacy settings page by clicking on the Privacy tab, which is directly below the Security tab in the column on the left hand side of the page.
.jpg?t=1397836423000)
Who can see your future posts?
Here you can set the default privacy setting for all of your future posts on Facebook. This setting is automatically set to "Friends." If you wish to further customize the audience for your future posts you can click on the edit button and select from the four following options:
- Public -- All Facebook users
- Friends -- Only those who you are directly connected to on Facebook
- Only Me -- No other Facebook users will be able to see any of your future posts on Facebook
- Custom -- You can create lists of specific contacts and Facebook users and designate them as the audience for -- or block them from view of -- your future posts.
Review all your posts and things you're tagged in.
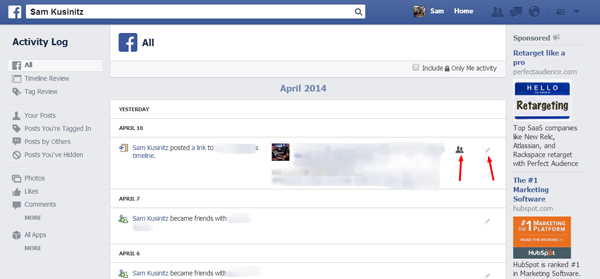
Here you can access your activity log by clicking on the "Use Activity Log" link. Your activity log offers a list of all of your posts, interactions, and activity on Facebook in reverse chronological order from your most recent action to your very first event on Facebook.
Directly to the right of each event in your activity log you’ll notice two icons:
.jpg?t=1397837219000)
1) The Audience Icon
You can use the first icon to control who can view posts shared on your own Timeline. When you interact with someone else’s content, whether that means commenting on a picture, Liking a post, or posting to someone else’s Timeline, that person gets to select the audience. As a result, while you can hover over the icon to view the audience who can see the posts you've shared or interacted with on other people's pages, you cannot edit the audience.
2) The Edit Icon
The second icon, which is shaped like a pencil, allows you to manage how a post appears on your Timeline. You can use this icon to highlight, hide, or remove a post from your Timeline. It’s important to note that hiding a story from your Timeline does not mean that it will be removed from Facebook entirely.
In order to remove an action from Facebook entirely, you will need to delete that action. For instance, if you Liked or commented on a friend's post and do not want the audience he/she has allowed to view your activity, you must delete your comment or unlike the post using this icon.
Limit the audience for posts you've shared with friends of friends or Public?
Although the aforementioned "Who can see your future posts?" setting can be used to designate the default setting for all of your future posts, it cannot be used to impact who can view posts you've shared in the past.
This setting, on the other hand, will allow you to start with a clean slate. Rather than comb through all of your past posts individually in your activity log, opting to "Limit Past Posts" will change the privacy setting on all of the posts you've shared on Facebook in the past.
Who can send you friend requests?
The default setting for this privacy option is "Everyone," which means all Facebook users can send requests to be friends with you on Facebook. You have the option to change this setting, but keep in mind that doing so could limit some of your offline ties from becoming online contacts through Facebook. No matter what, you will always have to confirm a friend request before anyone is connected with you on Facebook.
Whose messages do I want filtered into my Inbox?
Messages sent to your inbox are private chat messages that will not show up in any public places on Facebook. The default setting (and the setting Facebook recommends) is "Basic Filtering" which allows your friends and people that Facebook believes you are likely to know based on its algorithm to send you messages directly to your Facebook.
You can select to change this setting to "Strict Filtering." Keep in mind that even if you select the strict option, people Facebook believes you may know will still be able to send you messages -- those messages will just be filtered to your "Other" folder rather than your primary inbox. The "Other" folder can be easily accessed by clicking on the messages icon and then clicking "Other" located directly to the right of "Inbox."
Who can look you up using the email address you provided? / Who can look you up using the phone number you provided?
These two privacy options are designated to "Everyone" by default. Although you can change both of these settings to "Friends of Friends" or "Friends," the change will only apply to people who do not already have access to your email address and/or your phone number.
Do you want other search engines to link to your Timeline?
This is one of the most important settings on the basic privacy page. It is set to "on" if you have not previously edited this setting. This means a link to your Facebook Timeline will show up in search engine results when someone searches for your name. If this setting is on, anyone can easily locate your Timeline and view all of the public content on your profile page as long as they are logged into Facebook.
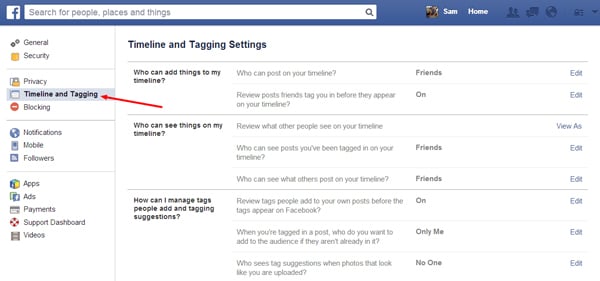
Timeline and Tagging
Timeline and Tagging is the other main privacy settings tool on Facebook. This section deals with managing the content that other people post on Facebook and the content other people tag you in.
.jpg?t=1397837444000)
Who can post on your Timeline?
This option controls who can post content to your Timeline. The default setting for this option allows only your Facebook friends to post on your Timeline. You can switch this setting to "Only Me" if you prefer, but that can greatly limit your interactions with your Facebook friends.
Review posts friends tag you in before they appear on your Timeline?
It's probably a good idea to switch this setting on as it ensures that nothing you are tagged in will be displayed on your profile without your approval. You can review posts you've been tagged in and select whether or not to allow them to be added to your Timeline by going back into your Activity Log and clicking on Timeline Review on the left side of the page.
Review what other people see on your Timeline
This tool lets you see your Timeline as it would appear to the general public or a specific contact. This is a great resource as it can help you assess your privacy level and identify specific posts on your Timeline that you may want to go back and edit in your activity log.
Who can see posts you’ve been tagged in on your Timeline?
This is a setting you may want to change as it is initially set to “Friends of Friends,” which means that anyone who is friends with one of your friends on Facebook can see all of the posts you’ve been tagged in on your Timeline. It's probably a good idea to change this privacy setting to either “Friends” or to a custom list.
Who can see what others post on your Timeline?
This setting should already be set to the “Friends” option. If you've limited who can post to your Timeline -- to only you or your Friends -- this setting shouldn't be too concerning.
Review tags people add to your own posts before the tags appear on Facebook?
If you turn on Tag Reviews you will be able to review the tags your friends add to your content before they are added to your post. This one is important because when someone is tagged in one of your posts, that individual as well as their entire friend network can view your post.
When you’re tagged in a post, who do you want to add to the audience if they aren’t already in it?
This setting is more impactful in helping your Friends maintain their privacy than protecting yourself. The default setting for this option is “Friends” which means if one of your contacts tags you in a post, all of your Friends, including those that you and the tagger don’t share, will be able to view the post.
Who sees tag suggestions when posts that look like you are uploaded?
Facebook’s Face-Recognition Software, DeepFace, is able to match two images of the same face almost as accurately as humans. Using this software, Facebook is able to suggest that a tag of you is added to a photo when one of your friends uploads a photo that looks like you. You can elect to disable these suggestions by switching this setting to “No One.”
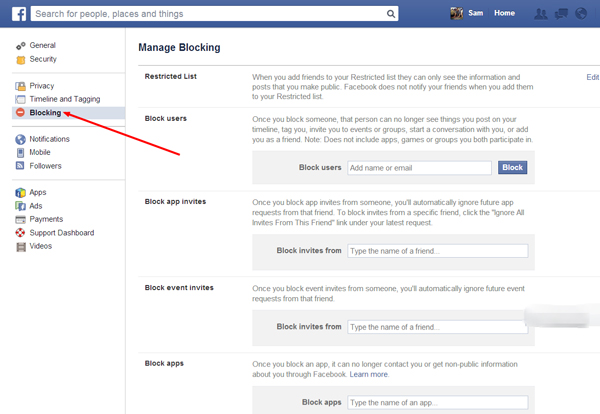
Blocking
Located directly below the “Timeline and Tagging” tab in the sidebar on the left side of the page is the “Blocking” tab. The Manage Blocking page is where you can restrict the way in which specific Facebook users and applications can interact with you and your Facebook Timeline.
.jpg?t=1397837835000)
Restricted List
Using the Edit List link next to this setting enables you to add and remove friends from your Restricted list. Once someone is added to the list, they will only be able to see the content and information that you designate as public.
Block users
Blocked users cannot directly interact with you or your Facebook profile in any way. They cannot view things you post on your Timeline, tag you in any posts, add you as a friend, invite you to groups or events, or start Facebook chats with you.
Block app invites
Blocking invites from a Facebook friend ensures that you will automatically ignore future app requests from that friend.
Block event invites
Like blocking app invites, blocking event invites from a friend means you’ll automatically ignore future event invitations from that friend.
Block apps
When you block an application, it can no longer contact you on Facebook or view any information about you through Facebook other than information that is available to a public audience.
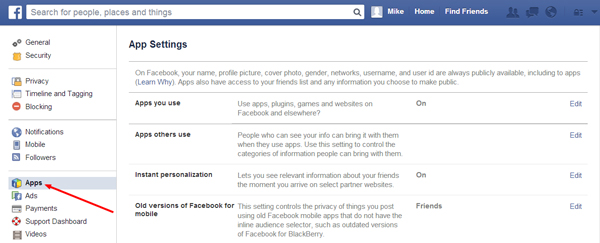
App Settings
When you use a third party application on Facebook, the application will generally ask you for your permission to access some of your content and information as well as the content and information that others have shared with you. It is your agreement with that app, not your initial agreement with Facebook, that controls how your information will be used, stored, and transferred.
The first thing worth noting is the message at the top of this page which lists the information that is always made public to third party applications. There are a number of things that you can do on this page to ensure that these 3rd party applications don't gain access to any additional information about you or your activity on Facebook.
(Editor's Note: Just as this post was published, Facebook announced some changes to the way users can access apps and share information with those apps. We're researching how this additional option will work, and will update the post soon with how to use it.)
Apps you use
To see a list of third party applications that are currently connected to your Facebook account, select the Apps tab from the list of links in the sidebar.
-2.jpg?t=1397838760000)
Now, if you look below the message, you will see a list of the Apps you use. Scroll down and click "Show All Apps." (I had 56 additional apps when I checked this feature.)
If you’re daring enough to want to see the information and content that your apps have access to, go ahead and click on the edit option next to some of your apps.
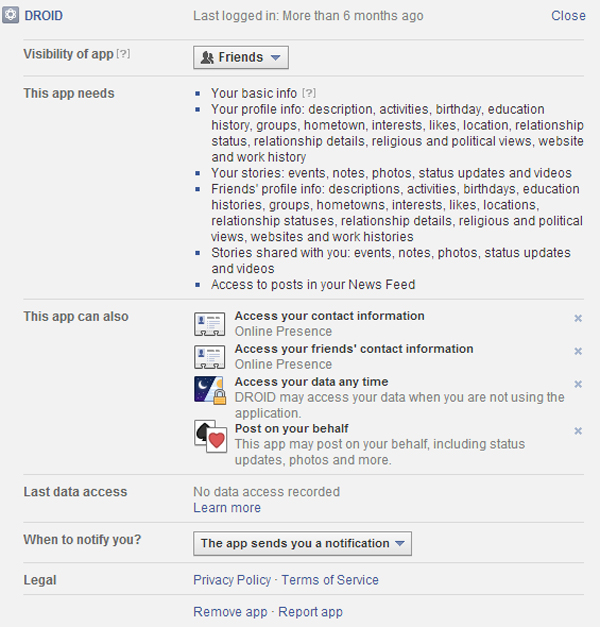
Now, if you would like to delete some of the applications from your Facebook, click on the “x” icon next to an application you wish to delete.
You will notice that there is a “Note” which states that the app may still have the data you shared with them even after you remove the app from your Facebook page. Unfortunately, there is really nothing you can do about this. However, what you can do to further salvage your privacy from these 3rd parties is click on the box below the note to ensure that you delete all of your activity on that app.
Apps others use
According to Facebook, other users can carry information about you with them when they use third party apps, exposing your information without notifying you.
The “Apps others use” column, located below your never ending list of apps, can be used to control the information that other Facebook users can expose about you when they use third party applications.
By clicking on the edit button in this section, you can control the information that other Facebook users can carry with them when they use applications.
If you don’t want apps and websites to access any of your information including your friends list, gender, or info you’ve made public, you can return to the top of the “App Settings” page and locate the first column under the “Apps you use” section and turn the setting to “off.” However, before you do this, it’s important to note that you will no longer be able to use any games or applications on Facebook.
Instant personalization
Facebook has partnered with a number of websites in order to provide you a personalized experience the moment you access one of their partner sites. Facebook states that these websites only have access to the information that is automatically public or that you have made public on Facebook. If you do not want to disable this feature, make sure that you have updated the various privacy settings discussed throughout this post to protect these websites from accessing your information and content.
 Alright, so here's my theory.


